Enjoy this fast and furious tutorial about how to create a starter template of react-native and prepare a CI/CD to deploy to the app-store automatically via github actions.
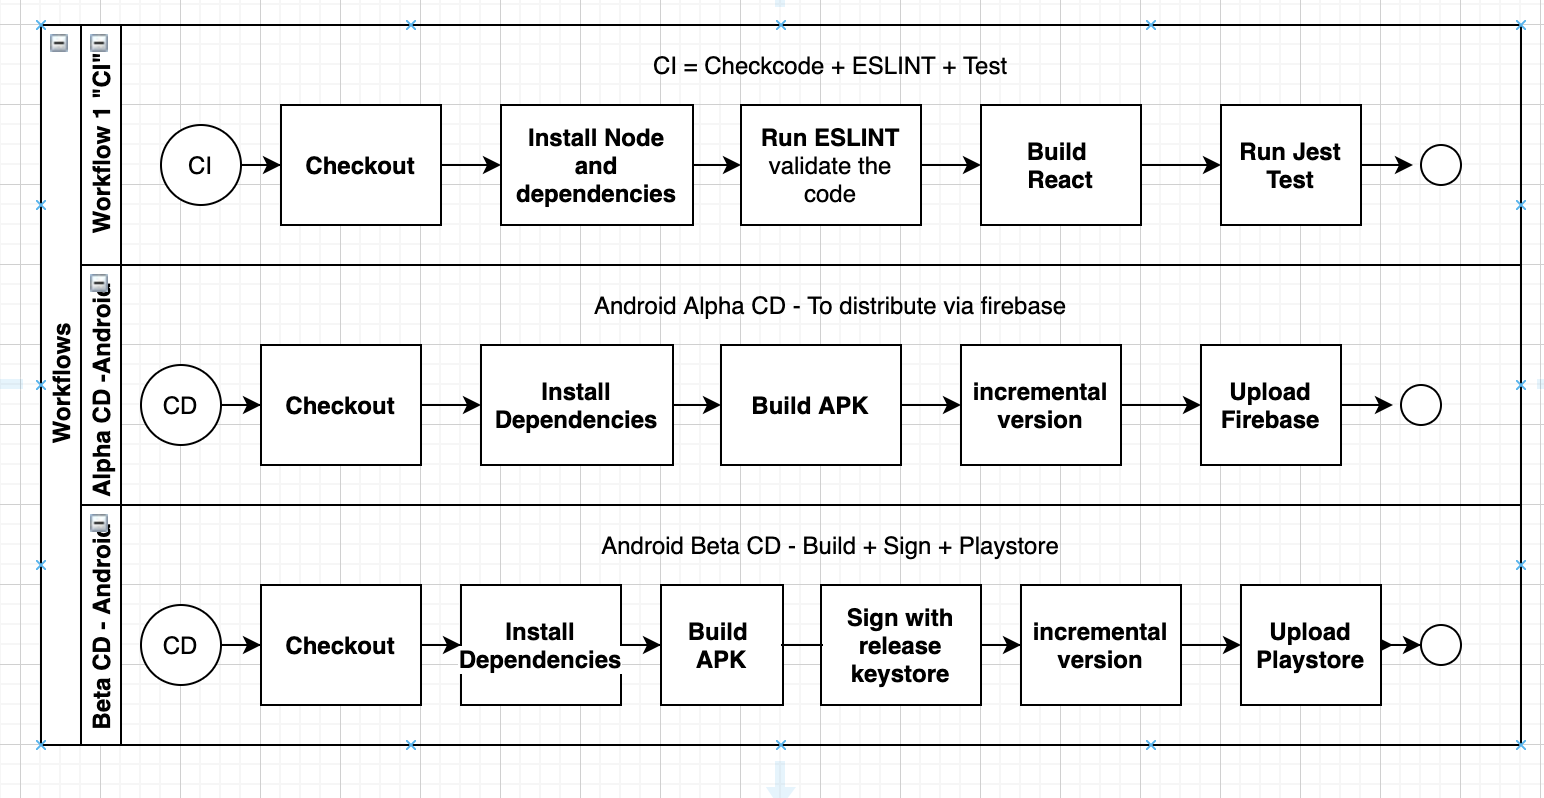
Android Workflows:
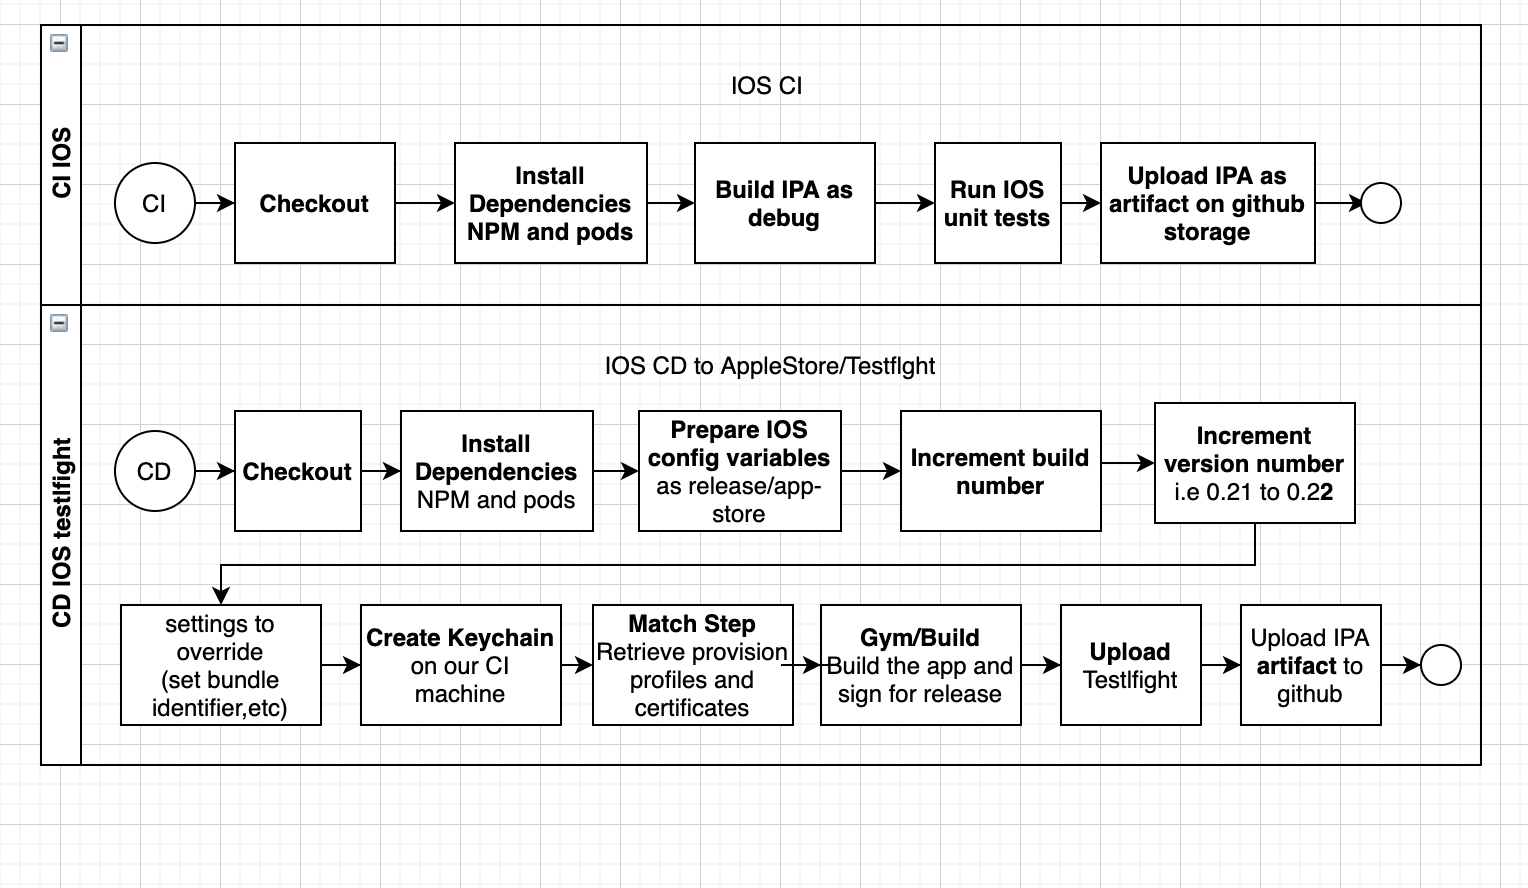
IOS workflows:
Note: Run fastlane add_plugin firebase_app_distribution (to trigger fastlane commands locally or we can just test github actions that already install this automatically
Note:If we want to run the automated job that upload a betaTesting build to googlePlay we should install the following:
fastlane add_plugin increment_version_code
And then we will be able to run this script to trigger the job locally:
fastlane android deploy_playstore
We should build our app and deploy automatically on testflight (appstore) to get a faster and automated release process.
Also we should be able to run a github action CI-IOS that has build + test jobs (native swift unit tests).
All these workflows are already saved on the repo into the .github/workflows folder and there we should see all the github actions as .yml files.
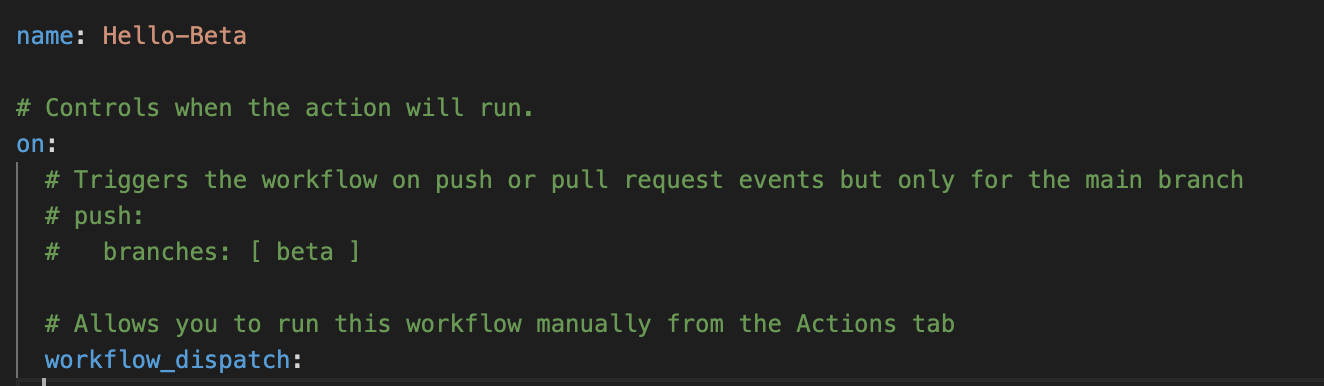
Also we can check at the top of each file to see how it is triggered and we can edit the trigger based on the following concepts:
Also it is important to mention that we already configured actions to install and use fastlane in order to build apps and deploy to Playstore or Testflight. So, you just need to perform simple updates on the code to trigger a complete CICD on android /IOS apps.
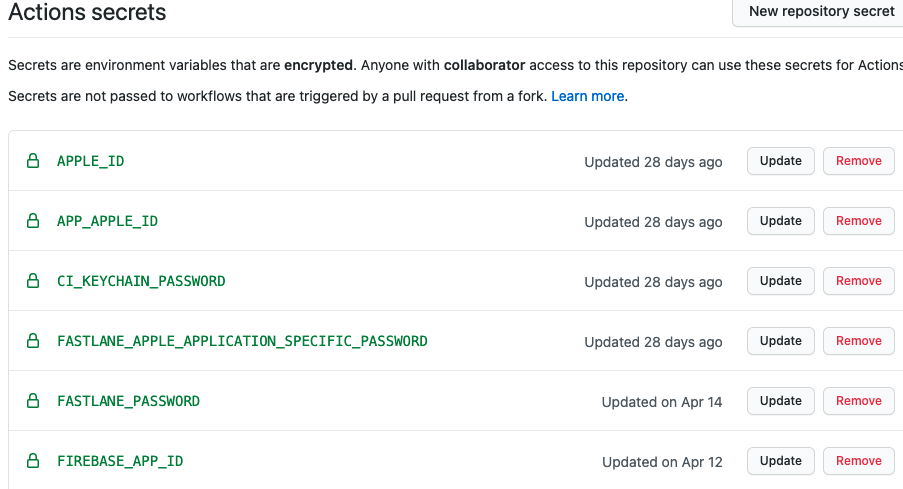
To open SECRETS we should go to our repository main link on github and click on “settings” tab, then we should see the option: “Secrets” and after adding our private info(described on Step6) we should see something like this:
We need to consider having installed Node , npm , xcode to run IOS apps and/or android Studio to test android apps.
Some common links about this:
Install Node/NPM:
https://docs.npmjs.com/downloading-and-installing-node-js-and-npm
Install xcode/AndroidStudio and reactNative setup explained below:
https://reactnative.dev/docs/environment-setup
AndroidStudio official Guide:
https://developer.android.com/studio/index.html
So, if we already have them we can continue with the next steps.
Well, let's create our basic CI/CD react app. We just need to clone on our local machine the following kickstarter reactnative +CICD project from github:
git clone https://github.com/smejia-developer-com/myReactNativeCICD.git
After this point we should be able to see our github actions workflows and fastlane lane tasks about CICD. Is important to mention that we integrate all this fastlane jobs to github actions and are already configured below the folder .github/workflows/*
If we want to implement new changes and test fastlane jobs we should install some things locally.
This way you don't have to install Ruby separately and instead homebrew installs the most adequate Ruby version for fastlane. See this page for details.
brew install fastlane
sudo gem install fastlane
Navigate your terminal to your project's directory and run
fastlane init
In order to get working the android fastlane CICD we should install the following plugins (on the root of the project):
fastlane add_plugin firebase_app_distribution
fastlane add_plugin increment_version_code
So, as we will generate a IOS app we need to run :
cd ios/ && pod install
Then we will be all set to run our simple App BUT we need to configure some details to get working our CICD.
On this step we should configure any extra details about firebase app distribution configuration and Google playStore config, keystore.
Step4.1: Open Firebase Console page (Visit the Firebase website)
Step4.2: Create a new firebase project (Select Android app Icon and follow the steps)
Step4.3: Add Firebase to your Android app ( set your android package name))
Step4.4: Follow the instructions to add google-services.json into your android project
Step4.5: Add the Firebase SDK into our project file called: “build.gradle” Once installed, open the General Settings page for the project. Scroll down to the Your apps section and get the AppID to be saved into your github action secrets(explained later).
Step4.6: Add testing group and add testers emails
And we should be all set on firebase.
More details on this great android fastlane tutorial:
https://www.raywenderlich.com/10187451-fastlane-tutorial-for-android-getting-started#toc-anchor-013
Step4.7: Go to Google Play Console (We assume that you already create a google developer account.
Step4.8: Click Settings and then click API access.
Step4.9: Click the CREATE SERVICE ACCOUNT.
Step4.10 Provide a custom Service account name
Step4.11 Choose role as Service Account User
Step4.12 Download the json config file.
Step4.13 Click the Grant Access button on your new service created
Step4.14 Choose Release Manager role
Step4.15 Click ADD USER button to complete the steps and you are all set!
More details on this great android fastlane tutorial:
https://www.raywenderlich.com/10187451-fastlane-tutorial-for-android-getting-started#toc-anchor-018
On this part we should configure our AppleStore and AppleConnect section to upload our IOS build directly to testflight. Also authenticating apple developer account and github account to use match signing process.
Step5.1> Setup Match locally ( https://docs.fastlane.tools/actions/match/)
Step5.2> Create a new, shared Apple developer account (this will be used by our CICD)
Step5.3> Create a Private Github Repository (To be used via match to save our provision Profiles and Apple IOS certificates).
Step5.4> Then run fastlane match development in your local machine and follow the steps.
Then do the same for the other methods(such as: ad-hoc and appstore).
(This fastlane match process should automatically set up all certificates, profiles and push to the remote repository).
At the end of all these steps our github actions will be able to run the fastlane to push the sign and push the IOS build from a virtual machine.
For more details about these config I suggest using the great IOS fastlane tutorials to configure our IOS CICD options about Apple store, itunes connect, sign and so on:
https://www.youtube.com/watch?v=Edr88s5YlH4
https://medium.com/@danielvivek2006/setup-fastlane-match-for-ios-6260758a9a4e
Before running our fastlane or github actions we should get and set all our secrets on our github repo and env variables into our code root/fastlane/.env .
With secrets we can get any key or ID from github actions like any env variable and it can be used in any part.
The secrets key that were used on our React CICD app are:
APPLE_ID => Apple account email used to login to appstore
APP_APPLE_ID=> AppApple ID that we can get from appstore connect page>into app info , be careful that it should be a number, not email (i.e. 11223344)
CI_KEYCHAIN_PASSWORD =>We used a custom psw when we create our keychain during IOS CD.
FASTLANE_APPLE_APPLICATION_SPECIFIC_PASSWORD=> Password token used on CI machines like github actions to avoid 2 factor auth in order to access to apple connect and more. Visit appleid.apple.com/account/manage then Generate a new application specific password and provide it using the environment variable FASTLANE_APPLE_APPLICATION_SPECIFIC_PASSWORD
FASTLANE_PASSWORD Our Apple connect psw credential
FIREBASE_APP_ID => Firebase internal App ID from firebase project App setting. We can get this from Firebase developer console -> settings ->App info (i.e.1:634242342:android:8ffesefesf3424)
GCP_DISTRIBUTE_KEY => json content of our google cloud platform json key
MATCH_PASSWORD =>Our Match passphrase selected to encrypt/decrypt our certificates.
MATCH_GIT_BASIC_AUTH_BASE64 => A base64 token used to authenticate to github certificates repo. The way how we generated this is running the following on our local terminal
echo -n your_github_username:your_personal_access_token | base64
DOTENV - Our .env file into fastlane folder that has all env variables used on CI CD:
Other important keys that we used on our ReactApp with CICD and are saved on our repo on the path: RootApp/fastlane/.env:
APP_IDENTIFIER => Our App bundle identifier i.e.com.yourapplename.appname
APP_STORE_TEAM_ID =>Our Itunes store team ID i.e.1112223333444
DEVELOPER_TEAM_ID => Our App developer program id (i.e. F123ABC765)
FASTLANE_USER=>Same as our AppleID email, ourappleaccount@xxxx.com
FASTLANE_TEAM_NAME=>Our Apple Team name. We can get this from applestore or apple developer console. I.e. “fakeCompany team”
FASTLANE_ITC_TEAM_NAME=>Same as above if we use the same Team name MATCH_GIT_BRANCH=main We select our default branch used in our certificates git repo (used by match) as the generator use master instead of main during the first time I recommend using this.
MATCH_APP_IDENTIFIER => Our app bundle info again
APP_IDENTIFIER =>Our app bundle info again (same as above)
CI_KEYCHAIN_NAME=myNewKeychainCICD =>Here we should add our custom name for a new keychain created during ios cd)
APP_STORE_TEAM_ID=Apple Store team Id. This should be numeric i.e 1112222333
After configuring Android details and IOS details and having set our secrets or .env variables then , we should be all set to test fastlane locally, so we should just go the root of our project repo and run:
fastlane
Then we will see all available lane jobs that we prepared and we can run selecting a number or just running a new command line using the specific lane to run locally:
Example running android ci:
fastlane android run_test_only
ALL Available Actions:
##IOS:
fastlane ios build_only_ios
Clean and Build IOS only
fastlane ios ios_build_with_match
Create Signed IPA Build
fastlane ios ios_beta_tesflight
Clean- Build - Sign and Distribute a new Beta testing App directly to AppleStore - testflight section
fastlane ios ios_tesflight_without_build
Try to Upload a fake binary to testflight without build in order to test your configuration on upload_testflight step. Very useful to avoid 2FA and losing minutes on github actions
fastlane ios ios_ci_tests
## Android:
fastlane android run_test_only
Runs all the tests
fastlane android build_as_debug
Android build as debug
fastlane android build_as_release
Android build as release
fastlane android firebase_deploy
Android build and distribute as alpha version via firebase App Distribution
fastlane android beta_crashlytic
Submit a new Beta Build to Crashlytics
fastlane android deploy_playstore
Deploy a new version android BETA testing build directly to Google PlayStore
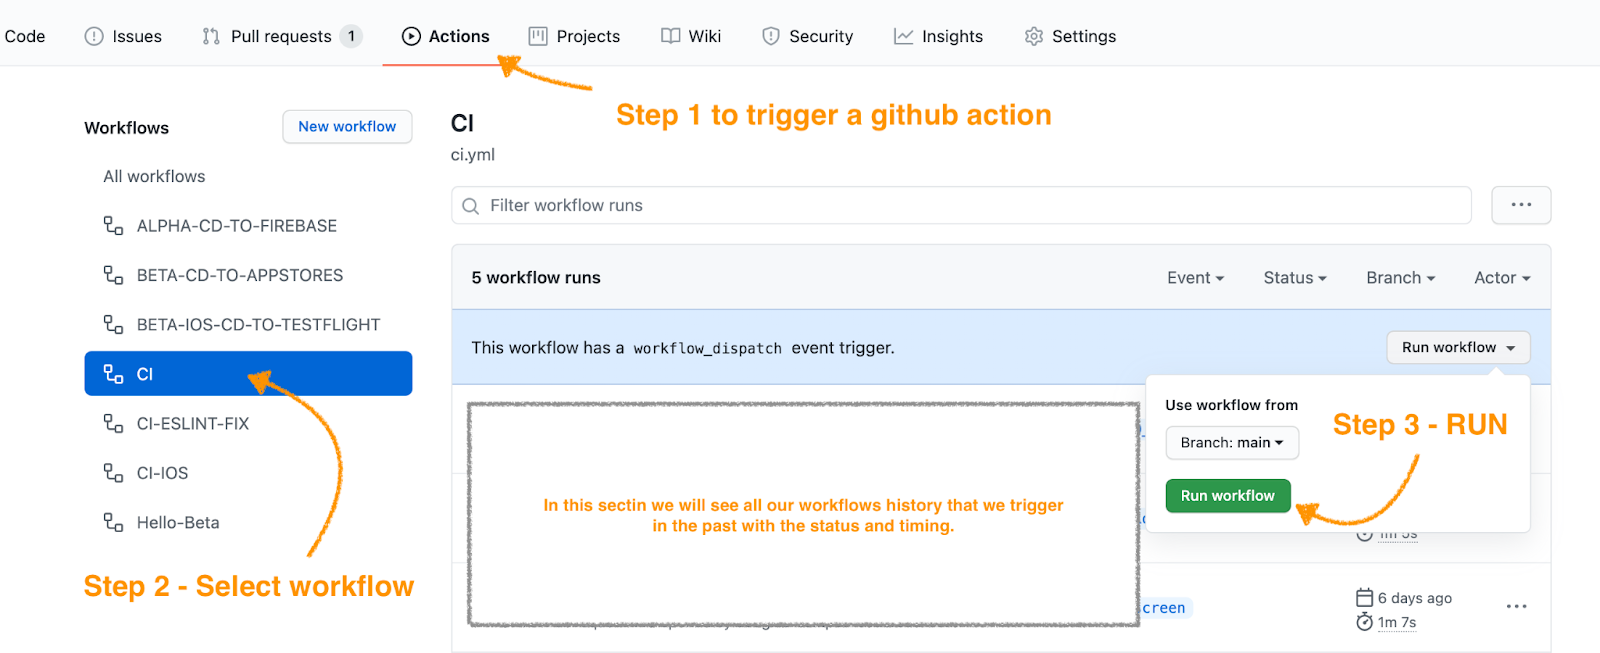
Now after configuring all our secrets and using your personal github repo we can test our new CICD directly on the Github actions section,as we implement a manual trigger in them too, after pushing your code and using the .github/workflows from our kickStart template we should see automatically github actions on our github main page. We just need to click the ACTIONS tab to see our action workflow list at the left.
The 3 simple steps to trigger a CICD workflow is described in the following image :
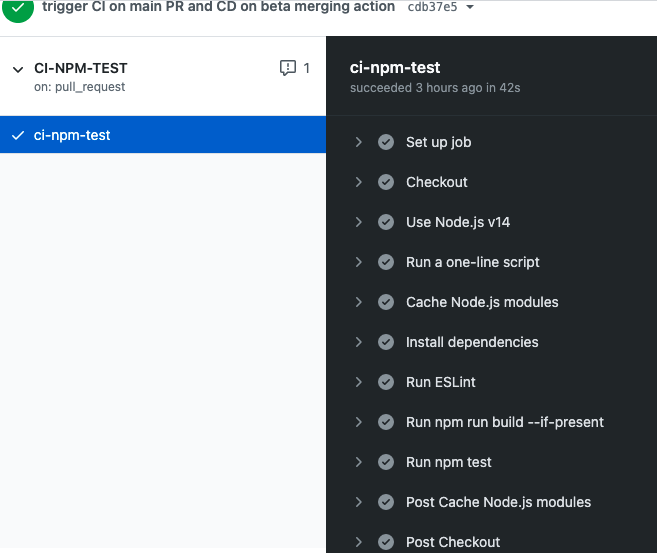
Then we can just click on the current workflow running to check step by step all the logs and if the workflow ran without errors. Like on our next image:
So, from here you can start testing the rest of the github actions(Doing the same way as the example above) and below is a simple explanation about how to process each one:
Is important to mention that the app can be promoted to release/Production manually from playstore.
Congratulations! Now you can play and test the rest of the workflows or edit them to be able to validate your code, distribute to firebase app Dist or PlayStore (beta testing) or directly to AppleStore/testflight IOS build to test in your personal iphone. ENJOY!